eMQTT Broker + Raspberry Pi + Docker
Today I started working on actualizing my home automation system that I’ve been planning for a while. The first step was building a platform that any wifi enabled device can communicate with and post information to. With that brief introduction, let’s jump right in.
MQTT
My research pointed towards the MQTT protocol as a lightweight publish/subscribe messaging system. Connected devices can “publish” messages or data to “topics” which other devices can “subscribe” to and be notified when new messages are posted to that topic, much like how you can subscribe to a Youtube channel and be notified when new videos are uploaded.
After looking around briefly at different MQTT brokers, I settled on eMQTT over at emqtt.io.
from their website:
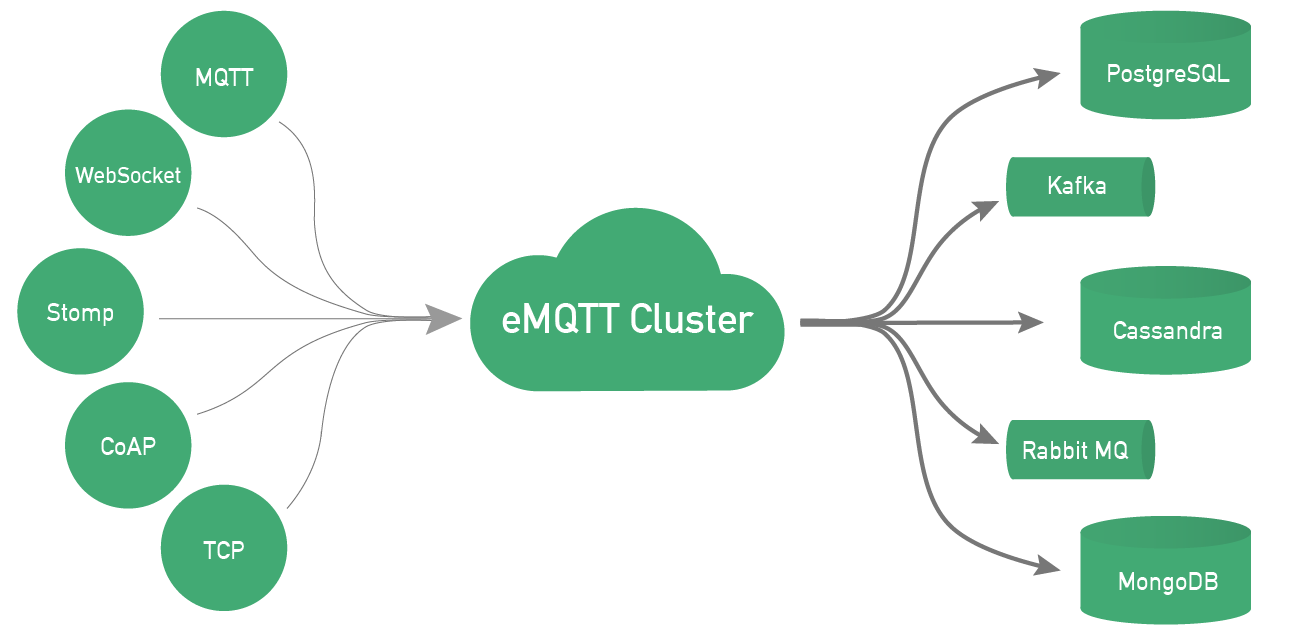
EMQ (Erlang MQTT Broker) is a distributed, massively scalable, highly extensible MQTT message broker written in Erlang/OTP.
EMQ is fully open source and licensed under the Apache Version 2.0. EMQ implements both MQTT V3.1 and V3.1.1 protocol specifications, and supports MQTT-SN, CoAP, WebSocket, STOMP and SockJS at the same time.
Docker
I chose Docker for this project simply because I’m trying to grow my skills and become more familiar with it. This is the only application running on the pi so there’s no reason to actually use Docker. If anything, it will help keep the application compartmentalized in the event of a security breach.
Raspberry Pi 3
I had a spare Raspberry Pi 3 laying around that I figured would be best suited for this job due to its low power usage and footprint. I realize the pi isn’t the best hardware platform for actual production use due to the SD card’s write lifespan, but with this setup it would be easy to create an image of the setup to restore on a new card or even just go through the process again since docker makes it super easy to replicate the setup in just a few minutes.
Setup
Here are the steps I used to get it working and the resources I used along thew way:
Flash Raspbian Lite to a microsd card using Etcher.
Boot into raspbian and change the default admin password. Default login is pi:raspberry
passwdUpdate the pi’s package listings and upgrade to the latest versions
sudo apt update && sudo apt upgradeInstall Docker via their convenience script. This is the only Docker approved way of installation on a raspberry pi. Be sure to read over the script before execution so you know what you’re getting yourself into. I’m not your mother, so do whatever you want.
curl -sSL https://get.docker.com | shVerify that the Docker daemon is running. I also like to reboot and run the below command again just to validate that it starts at boot.
systemctl show --property ActiveState dockerInstall Git via rasbian’s package manager.
sudo apt install gitInstall the docker EMQ container. I found the official EMQ docker container difficult to install, though this container makes it very simple. It is maintained by docker user aksakalli.
A few notes about this command. -d makes the container process run in the background so you maintain console access. --restart unless-stopped starts the container whenever docker is restarted, unless the container was manually stopped. Port 18083 is being mapped to the host(rpi) for access to the EMQ dashboard. Port 1883 is being mapped to the host for incoming/outgoing MQTT messages.
sudo docker run -d --restart unless-stopped -ti --name emq -p 18083:18083 -p 1883:1883 aksakalli/rpi-emqOnce completed, access the EMQ dashboard at
Select the Admins tab on the left, select the edit button for the admin user, and change the default password.
(Optional) Create other user accounts for other devices you want to connect. They will still be admin accounts, so I’m not sure if there’s any advantage to doing that or not.
(Optional) Select Plugins and activate an authentication plugin for posting messages. I used emq_auth_username for basic username:pass authentication.
That’s as far as I’ve gotten with this setup. EMQ has a lot of plugin extensions and capabilities that I’m not using currently. Down the road I’ll be looking into SSL encryption for my messages, but it’s another layer of complexity that I have no experience with… yet.
Thanks for reading, I hope you learned as much reading this as I did writing it.
